Cleaning the Inside of the Printer
Solution
* A4 plain paper is required to clean the fixing roller. Have A4 plain paper ready.
1. Load A4 plain paper in the multi-purpose tray.
For details on the procedures for loading paper, see "e-Manual" (HTML manual) in the CD-ROM supplied with the printer.
NOTE
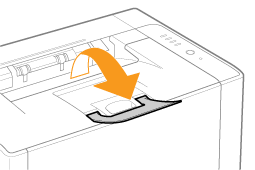
Open the auxiliary tray before cleaning.
2. Click [  ] in the Windows task tray, and then select the printer name.
] in the Windows task tray, and then select the printer name.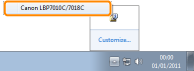
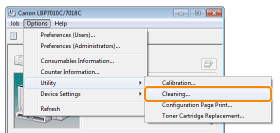
3. From the [Options] menu, select [Utility] → [Cleaning].
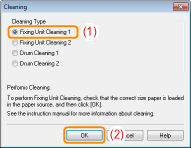
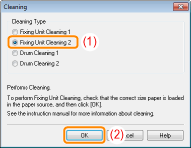
4. Select [Cleaning Type].
(1)Select [Fixing Unit Cleaning 1].
(2)Click [OK].
→The paper is fed, and the printer starts cleaning the fixing roller.
NOTE
When the printed paper has smudge marks even if [Fixing Unit Cleaning 1] is performed
- See "Performing [Fixing Unit Cleaning 2]" and perform [Fixing Unit Cleaning 2].
Cleaning time
- It takes approximately 130 seconds.
* Cleaning the fixing roller cannot be canceled. Please wait until it is completed. (The cleaning is finished when the paper is output completely.)
* A4 plain paper is required to perform [Fixing Unit Cleaning 2]. Have A4 plain paper ready.
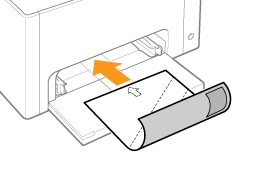
1. Load A4 plain paper in the multi-purpose tray.
For details on the procedures for loading paper, see "e-Manual" (HTML manual) in the CD-ROM supplied with the printer.
NOTE
Open the auxiliary tray before cleaning.
2. Click [ ] displayed in the task tray, and then select a printer name.
] displayed in the task tray, and then select a printer name.3. From the [Options] menu, select [Utility] → [Cleaning].
4. Select [Cleaning Type].
(1)Select [Fixing Unit Cleaning 2].
(2)Click [OK]. Then, the cleaning page is printed.
5. If any paper is loaded in the multi-purpose tray, remove it.
6. Load the cleaning page in the multi-purpose tray with the printed side facing down.
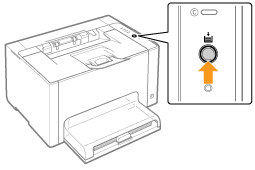
7. Press the [  ] (Paper) key.
] (Paper) key.→The cleaning page is fed into the printer, and the printer starts cleaning the fixing roller.
NOTE
Cleaning time
- It takes approximately 90 seconds.
* Cleaning the fixing roller cannot be canceled. Please wait until it is completed. (The cleaning is finished when the paper is output completely.)
1. Click [ ] displayed in the task tray, and then select a printer name.
] displayed in the task tray, and then select a printer name.2. From the [Options] menu, select [Utility] → [Cleaning].
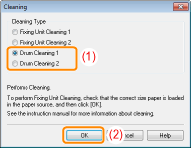
3. Select [Cleaning Type].
(1)Select [Drum Cleaning 1] or [Drum Cleaning 2] depending on the symptoms.
(2)Click [OK].
→The message <Cleaning> appears in the Printer Status Window, and the printer starts cleaning the photosensitive drum.
| [Drum Cleaning 1] | Select when short white streaks (lines) appear at equal distance on the images (especially in a high-humidity environment). |
| [Drum Cleaning 2] | Select when the following circumstances occur. ・Long black streaks (lines) appear on the images (especially in a low temperature environment). ・Short black streaks (lines), smudge marks, or white points appear at equal distance on the images (especially in a high temperature environment). |
NOTE
Cleaning time
- [Drum Cleaning 1]: It takes approximately 93 seconds.
- [Drum Cleaning 2]: It takes approximately 125 seconds.
* Cleaning the photosensitive drum cannot be canceled. Please wait until it is completed.