How to convert RAW images to JPEG or TIFF (Digital Photo Professional)
สารละลาย
IMPORTANT
- The [Digital Photo Professional] software application is required to perform the following procedure. If [Digital Photo Professional] is not installed on your computer, please download [Digital Camera Software] from the Canon homepage, and use it to install [Digital Photo Professional].
- Operations for Windows 7 are explained here.
- Make sure to download the RAW images you want to convert beforehand.
1. Double-click the [Digital Photo Professional] icon that appears on the desktop.

If you cannot find the [Digital Photo Professional] shortcut icon on your desktop, click [Start] ( ) > [All Programs] or [Programs] > [Canon Utilities] and select [Digital Photo Professional] to start [Digital Photo Professional].
) > [All Programs] or [Programs] > [Canon Utilities] and select [Digital Photo Professional] to start [Digital Photo Professional].2. When [Digital Photo Professional] starts, the following window appears.
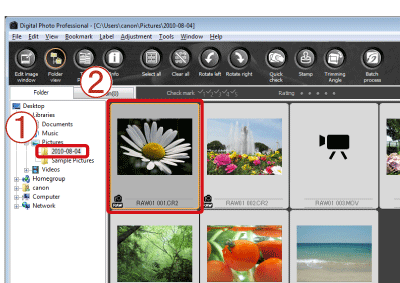
 Select the folder in which the image you want to convert is saved. (Images are saved to the [My Pictures] folder by default)
 Double-click and select the RAW image you want to convert to JPEG or TIFF.
3. The following window appears.

Click [File], and from the menu that appears, click [Convert and save].
[File], and from the menu that appears, click [Convert and save].4. The following window appears.
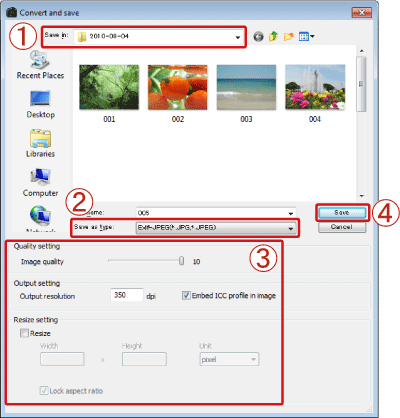 Confirm the destination from [Save in]. Click [Save as type], and select [Exif-JPEG] from the menu that appears (if converting to JPEG).
  As necessary, make the following settings: [Quality setting], [Output setting], and [Resize setting]. (These settings are not necessary unless you want to degrade the image quality.)
 Click [Save].