Sending Images from a Camera to an iPhone (PowerShot SX730 HS)
สารละลาย
There are several ways to connect the camera to a smartphone and send images.
<Connect via Bluetooth>
- You can easily connect the camera to a Bluetooth enabled smartphone by pairing them. This simplifies transferring images to a smartphone.
<Connect via the Wi-Fi menu>
- You can connect the camera to a smartphone as you would connect it to a computer or other device. Multiple smartphones can be added.
IMPORTANT
- For convenience in this article, iPhones and tablets (iPad) are collectively referred to as "smartphones".
- Before connecting to the camera, you must install the free dedicated Camera Connect app on the smartphone.
- Privacy settings must be configured in advance to allow image viewing on the smartphone.
- Connections require that a memory card be in the camera.
NOTE
- In the following explanation, smartphone setting procedures are indicated by the
 icon, and camera setting procedures are indicated by the
  icon.
icon. - Do not cover the Wi-Fi antenna area with your hands or other objects. Covering the antenna may decrease the speed of image transfers.
- Depending on the condition of the network you are using, it may take a long time to send movies. Be sure to keep an eye on the battery level.
- When sending movies to smartphones, note that the supported image quality varies depending on the smartphone. For details, refer to the smartphone user manual.
- On the screen, wireless signal strength is indicated by the following icons :
- [  ] : high ] , [
  : medium ] , [
  : low ] , [
  : weak ]
] : high ] , [ : medium ] , [ : low ] , [ : weak ] 1-A-1. Confirm the smartphone's settings.- Make sure that [Airplane mode] is not set.
- Touch [Wi-Fi].
- Set the [Bluetooth] switch to [ON].
NOTE
Please refer to the related information for details on the smartphones which can be connected with a camera wirelessly.
1-A-2. Download Camera Connect from the App Store and install it on the smartphone.IMPORTANT
- The Camera Connect application is free, but separate connection charges for accessing the App Store may be applicable.
- An Apple account is necessary to download Camera Connect.
- Downloading the application via a cellular network may take longer than downloading via Wi-Fi.
- The home screen will reappear when the installation of Camera Connect is complete.
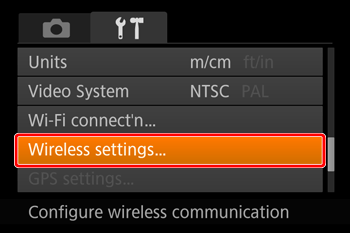
1-A-3. Press the power button. 1-A-4. Press the [MENU] button, choose [Wireless settings] on the [  ] tab.
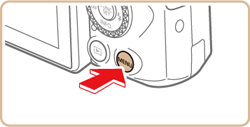
 1-A-5. Press the [
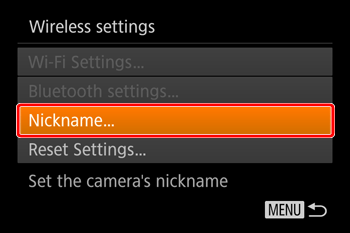
  ] , [
] , [  ] buttons to choose [Nickname], and then press the [
  ] button.
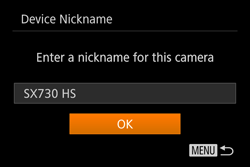
 1-A-6. Press the [ ] button to access the keyboard, and then enter a nickname.
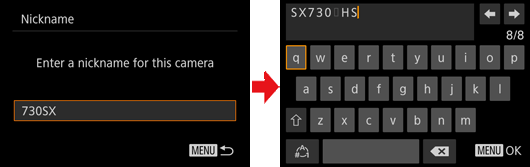 1-A-7. To return to [Wireless settings] after pressing the [MENU] button, press the [MENU] button again.
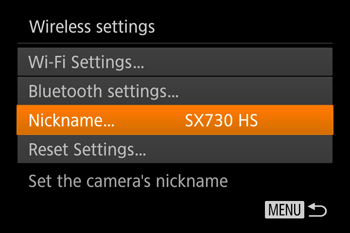 1-A-8. Choose [Bluetooth settings], press the [ ] , [ ] buttons to choose [Pairing], and then press the [ ] button.
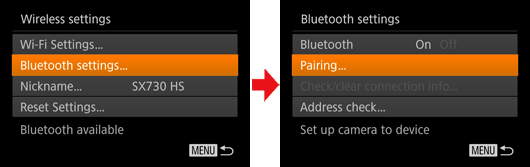 1-A-9. A screen is displayed indicating that the camera is waiting to connect.
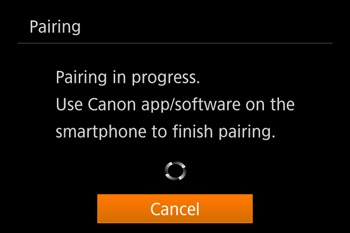 1-A-10. Touch the [Canon Connect] (
 ) application icon on the smartphone to start [Camera Connect].
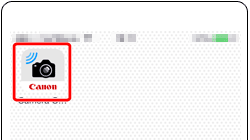 1-A-11. After the camera is recognized, a camera selection screen is displayed.
 - Select the camera to connect to.
 1-A-12. Touch [pair].
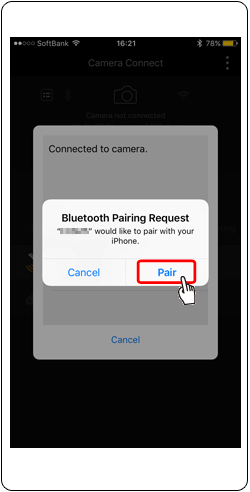 1-A-13. Press the [
  ] , [
] , [  ] buttons to choose [OK] after the confirmation message on the camera, and then press the [ ] button.
 1-A-14. Press the [ ] button when the screen at left is displayed.
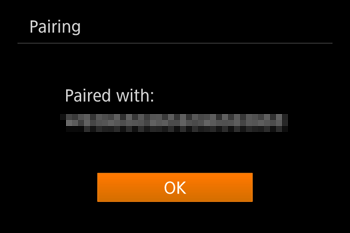
IMPORTANT
- Battery life may be shorter when you use the camera after pairing, because power is consumed even when the camera is off.
- Before bringing the camera to places where the use of electronic devices is restricted, set [Bluetooth] to [Off], to avoid having the camera ready for Bluetooth communication even when it is off.
•Proceed to Step 2-A : Transferring Images to a Bluetooth Enabled Before Use Smartphone.
- These steps show how to use the camera as an access point, but you can also use an existing access point.
1-B-1. Confirm the smartphone's settings.- Make sure that [Airplane mode] is not set.
- Set the [Wi-Fi] switch to [ON].
NOTE
Please refer to the related information for details on the smartphones which can be connected with a camera wirelessly.
1-B-2. Download Camera Connect from the App Store and install it on the smartphone.IMPORTANT
- The Camera Connect application is free, but separate connection charges for accessing the App Store may be applicable.
- An Apple account is necessary to download Camera Connect.
- Downloading the application via a cellular network may take longer than downloading via Wi-Fi.
- The home screen will reappear when the installation of Camera Connect is complete.
1-B-3. Press the power button. 1-B-4. Press the [  ] button,
NOTE
- If the [Device Nickname] screen is displayed, press the [ ] button.
- This nickname will be displayed on [Select a Device] screen when connecting to other devices via Wi-Fi.
- To change the camera’s nickname, press the [ ] , [ ] buttons to choose the [Nickname] field, press the [ ] button to display the keyboard, and then enter the desired nickname. After you have finished entering the nickname, press the [MENU] button to return to the registration screen, press the [ ] button, choose [OK], and then press the [ ] button.
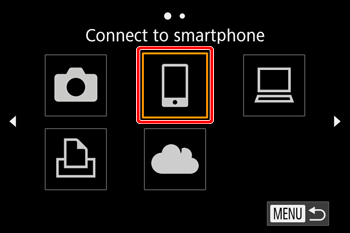
1-B-5. Press the [ ] , [ ] , [ ] , [ ] buttons to choose [  ] , and then press the [ ] button.
 1-B-6. Press the [ ] , [ ] buttons to choose [Add a device], and then press the [ ] button.
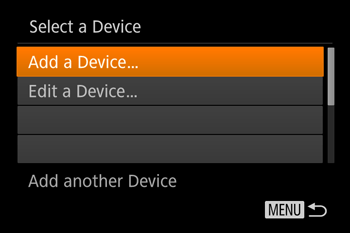
NOTE
- Once you have connected to devices via the Wi-Fi menu, recent destinations will be listed first when you access the Wi-Fi menu. You can easily connect again by pressing the [ ] , [ ] buttons to choose the device and then pressing the [ ] button. To add a new device, display the device selection screen by pressing the [ ] , [ ] buttons, and then configure the setting.
- If you prefer not to display recent target devices, choose MENU -> [ ] tab -> [Wireless settings] -> [Wi-Fi Settings] -> [Target History] -> [Off].
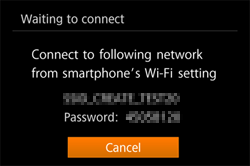
1-B-7. The camera's SSID and password are displayed.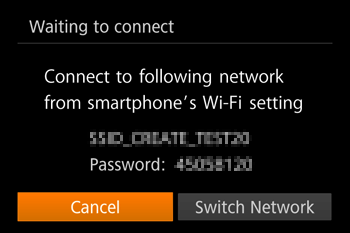 1-B-8. Wi-Fi setting menu, choose the SSID (network name) displayed on the camera to establish a connection.
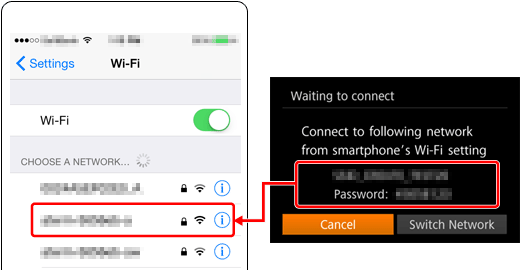
- In the password field, enter the password displayed on the camera.
NOTE
- To connect without entering a password in step 8, choose MENU -> [ ] tab -> [Wireless settings] -> [Wi-Fi Settings] -> [Password] -> [Off]. [Password] is no longer displayed on the SSID screen (in step 7).
- Make sure that the camera and the smartphone are connected and then touch the home button to return to the home screen.
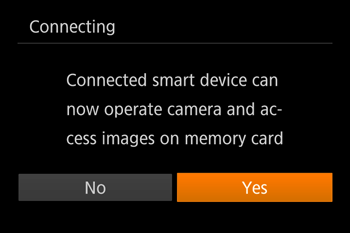
1-B-9. Touch the [Canon Connect] () application icon on the smartphone to start [Camera Connect]. 1-B-10. On the camera selection screen displayed on the smartphone, choose the camera to begin pairing.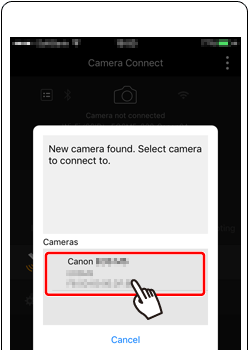 1-B-11. Adjust the privacy setting.
- Press the [ ] , [ ] buttons to select [Yes], and then press the [ ] button.
REFERENCE
- You can now use the smartphone for remote live view shooting, or to browse or transfer images on the camera.
- Once you have registered a smartphone, you can change privacy settings for it on the camera.
1-B-12. The following screen is displayed when the connection with the smartphone is established.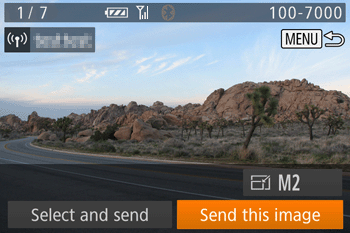
•Proceed to Step 2-B. Viewing and Saving Images with the Smartphone.
2-A-1. Touch [Images on camera]( ) in Camera Connect.
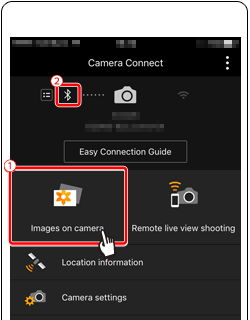
NOTE
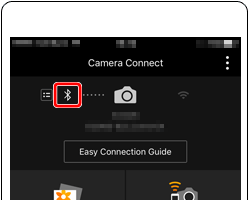
- Bluetooth connection status is indicated by one of the following icons (
 ).
).
- [  : Connected ] , [
  : Disconnected ]
: Connected ] , [ : Disconnected ]- To check the information of the smartphone connected via Bluetooth in [Check/clear connection info], choose MENU -> [ ] tab -> [Wireless settings] -> [Bluetooth settings]. Choose [Address check] to check the camera's Bluetooth address.
REFERENCE
- The camera's SSID and password are displayed.
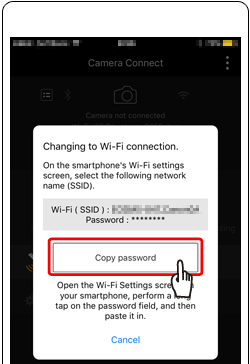
 2-A-2. Changing to Wi-Fi connection.
- The following screen is displayed, touch the [Copy password].
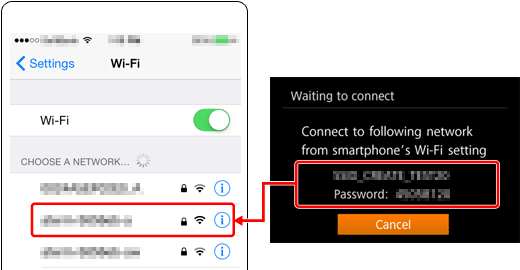
 2-A-3. Wi-Fi setting menu, choose the SSID (network name) displayed on the camera to establish a connection.
In the password field, enter the password displayed on the camera.
- Make sure that the camera and the smartphone are connected and then touch the home button to return to the home screen.
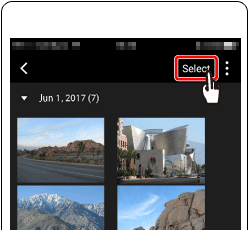
2-A-4. Start Camera Connect on the smartphone. 2-A-5. Use the smartphone to import images from the camera to the smartphone.- When the camera is connected to the smartphone, a list of the images on the camera will appear in [Camera Connect]. Touch [Select] appearing in the upper right of the screen.
 2-A-6. After the screen refreshes, choose the desired images, and then touch [
  ] on the bottom right of the screen. The selected images will be saved to the smartphone.
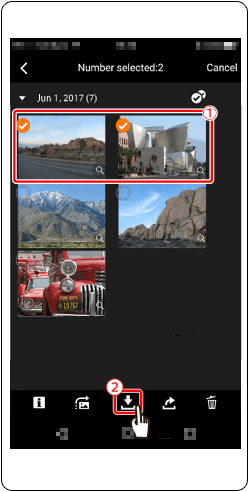 2-A-7. After the images have been saved, touch [
  ] appearing in the upper right of the screen, and then touch [
  ] in the upper left of the screen to return to the menu screen.
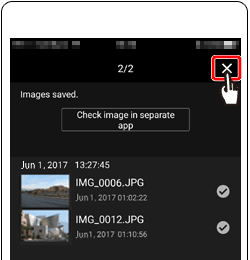

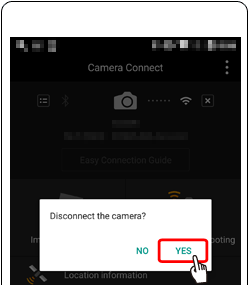
 2-A-8. To end the connection, touch the [
  ] icon displayed in the upper right of the screen, and then touch [YES].
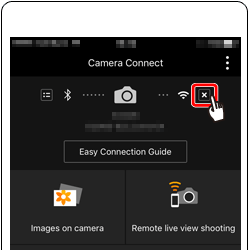
- This concludes the explanation of the procedures for operating the smartphone to send images.
REFERENCE
- To switch to Bluetooth, disable the Wi-Fi connection on the smartphone.
 2-B-1. Touch [Images on camera]() in Camera Connect.
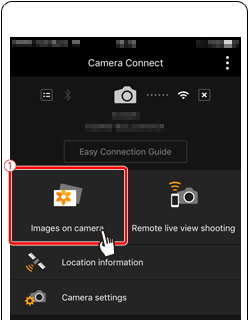 2-B-2. Use the smartphone to import images from the camera to the smartphone.
- When the camera is connected to the smartphone, a list of the images on the camera will appear in [Camera Connect]. Touch [Select] appearing in the upper right of the screen.
2-B-3. After the screen refreshes, choose the desired images, and then touch [ ] on the bottom right of the screen. The selected images will be saved to the smartphone. 2-B-4. After the images have been saved, touch [ ] appearing in the upper right of the screen, and then touch [ ] in the upper left of the screen to return to the menu screen. 2-B-5. To end the connection, touch the [ ] icon displayed in the upper right of the screen, and then touch [YES].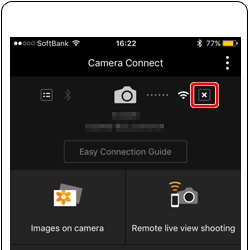
- This concludes the explanation of the procedures for operating the smartphone to send images.
Use the on-screen keyboard to enter information, Wi-Fi connections, and so on.
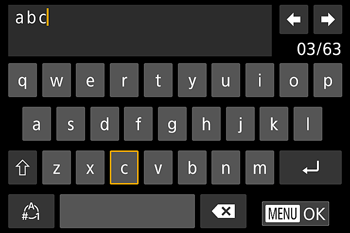
- Entering Characters
- Press the[ ] [ ] [ ] [ ] buttons to choose a key labeled with a character, and then press the [ ] button repeatedly to enter the character you want.
] [ ] [ ] [ ] buttons to choose a key labeled with a character, and then press the [ ] button repeatedly to enter the character you want.- Moving the Cursor
- Choose [  ] or [
  ] and press the [ ] button.
] or [ ] and press the [ ] button.- Entering Line Breaks
- Choose [  ] and press the [ ] button.
] and press the [ ] button.- Switching Input Modes
- To switch to other kinds of characters (such as numbers or symbols) on this screen, choose  and press the [ ] button.
and press the [ ] button. - To enter uppercase letters, choose [  ] and press the [ ] button.
] and press the [ ] button. - Available input modes vary depending on the function you are using.
- Deleting Characters
- Choose [  ] and press the [ ] button. The previous character will be deleted.
] and press the [ ] button. The previous character will be deleted. - Choosing [ ] and holding down the [ ] button will delete five characters at a time.
] and holding down the [ ] button will delete five characters at a time.- Returning to the Previous Screen
- Press the [MENU] button.